
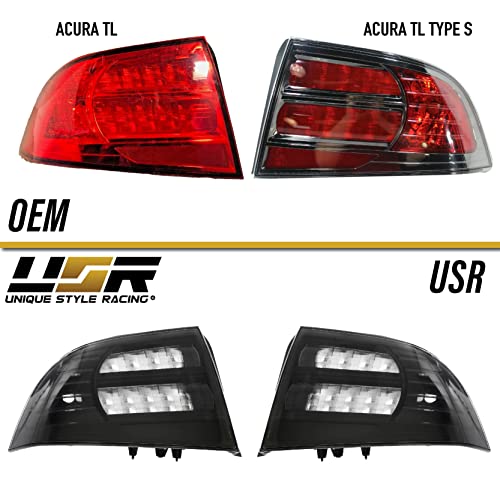
Confirmed Vehicle Fitment
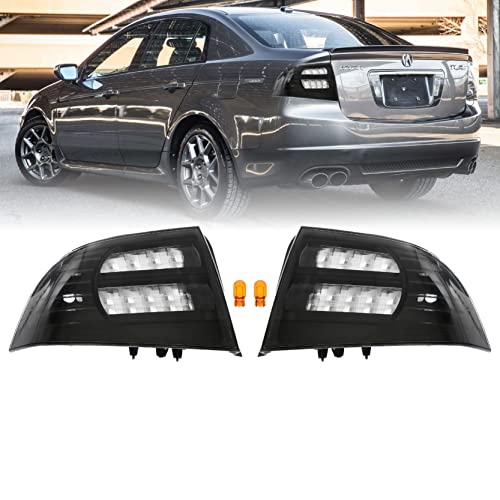
These housings are sold for:
- 2004 Acura TL Base
- 2004 Acura TL A-Spec
- 2005 Acura TL Base
- 2005 Acura TL A-Spec
- 2006 Acura TL Base
- 2006 Acura TL A-Spec
- 2007 Acura TL Base
- 2007 Acura TL Type-S
- 2008 Acura TL Base
- 2008 Acura TL Type-S
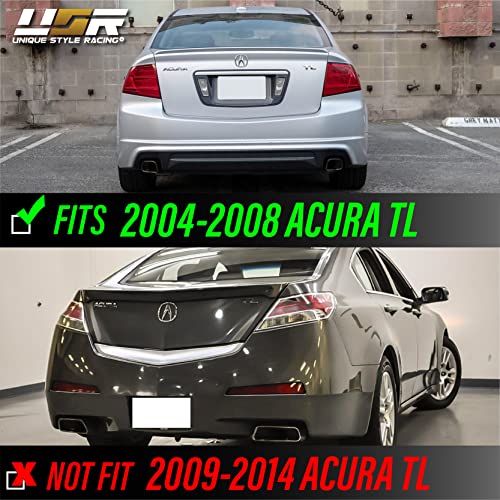
The listing identifies compatibility across the 2004–2008 third-generation Acura TL range. Always verify the exact product number, connector arrangement and package contents before ordering.
Fitment should not be confused with completeness. These are replacement housings that require transferring factory components. Review the Vehicle Fitment Parts Guide for Smart Buyers before ordering any lighting part based only on a photograph or broad vehicle description.
Important: These Housings Reuse Factory Components
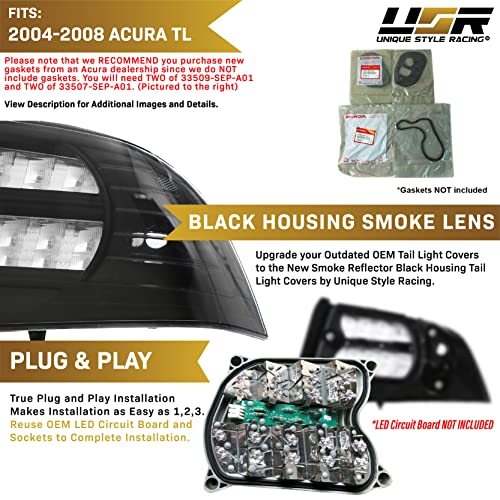
This product is not described as a completely preassembled tail-light conversion. Installation requires transferring the original LED circuit boards and related factory hardware into the replacement housings.
Components that may need to be transferred include:
- Factory LED circuit boards
- Electrical connectors
- Bulb sockets
- Seals or gaskets
- Mounting nuts
- Retaining clips
- Vehicle-specific wiring hardware
A pair of amber bulbs is included according to the supplied product information.
Inspect the factory electronics before installation. A replacement housing will not repair a failed circuit board, corroded connector, damaged socket or wiring fault.
DEPO Construction and OEM-Style Fit
DEPO manufactures these housings from ABS and polycarbonate materials shaped around the third-generation TL’s original rear-body openings.
Product features include:
- Vehicle-specific housing contours
- Factory-style mounting locations
- ABS rear housings
- Polycarbonate outer lenses
- UV-resistant lens material
- Impact-resistant construction
- Manufacturer-sealed housing joints
- Water-resistant assembly
- Left-and-right matched set
“Water resistant” does not mean the housings should be submerged or blasted directly at their seams with a pressure washer. After installation, inspect the seals and trunk area for moisture.
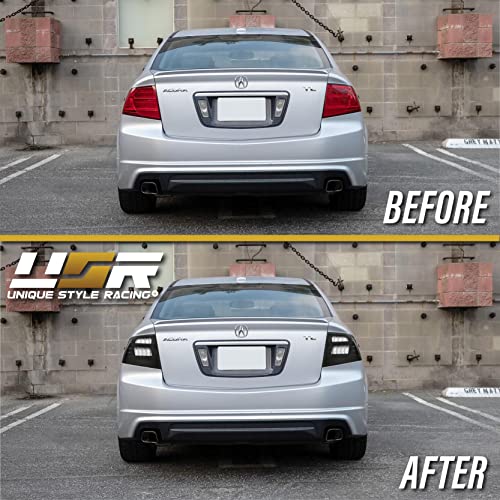
Smoked Lenses Without Tint Film
Spray tint and adhesive film can create inconsistent light output, peeling edges or a blotchy finish. These lamps use purpose-built smoked lenses over black housings, giving the appearance a more consistent finish.
Advantages over applying tint to old housings include:
- Uniform left-to-right color
- No adhesive film edges
- No overspray
- No sanding of the factory lenses
- Fresh polycarbonate surfaces
- Replacement of cracked or weathered outer housings
- Cleaner black-housing appearance
Because smoked lenses can reduce perceived light output, test every lighting function after installation and verify that the lamps remain visible from required angles.
Lighting and Legal Considerations
Rear lighting is safety equipment, not simply body trim. Before driving, confirm that the installed lamps provide clearly visible:
- Tail lights
- Brake lights
- Turn signals
- Reverse lights
- Side-marker functions where applicable
Do not assume that aftermarket fitment automatically establishes road legality. Verify required markings, reflector visibility, bulb color and local regulations before installation.
In the United States, rear-lighting requirements are governed by Federal Motor Vehicle Safety Standard No. 108. State inspection and vehicle-lighting rules may add further requirements.
The smoke finish must not prevent the lamps from producing the required color or adequate visibility. If a housing lacks the required certification markings for your application, treat it as an off-road or show-use product until compliance is confirmed.
What Is Included?
The package is described as including:
- One driver-side tail-light housing
- One passenger-side tail-light housing
- One pair of amber bulbs
Factory LED circuit boards and other original electrical components must be transferred unless the final seller package specifically states otherwise.
Inspect the package before beginning installation. Do not remove both factory lamps until you confirm that the replacement set includes the correct left and right housings and has arrived without shipping damage.
Tools You May Need
A typical installation may require:
- Metric socket set
- Ratchet and extension
- Trim-panel removal tools
- Phillips screwdriver
- Small flat-blade screwdriver
- Clean gloves
- Microfiber towels
- Electrical contact cleaner
- Dielectric grease where appropriate
- Plastic-safe cleaner
- Low-pressure water source for leak testing
Use the factory service procedure for the exact model year whenever possible.
How to Install USR DEPO Tail Lights on a 2004–2008 Acura TL
1. Park and Prepare the Vehicle
Park on a level surface, switch off the ignition and open the trunk. Remove loose cargo that could interfere with the trunk trim.
Allow the factory lights to cool before handling bulbs or circuit boards.
2. Disconnect the Battery if Required
Follow Acura’s service procedure before disconnecting electrical components. If battery disconnection is necessary, remove the negative terminal first.
Some electronic settings may need to be restored after power is disconnected. Keep the trunk open and avoid accidentally locking yourself out while performing the job. The car does not need to participate in the joke.
3. Remove the Trunk Trim
Carefully remove the clips or retainers securing the rear trunk liner. Use a plastic trim tool to avoid damaging the panel or painted surfaces.
Set each clip aside in an organized container.
4. Disconnect the Tail-Light Wiring
Locate and disconnect the factory tail-light electrical connectors. Pull on the connector body, not the wires.
Inspect for:
- Corroded terminals
- Bent pins
- Heat damage
- Loose connector locks
- Water intrusion
- Damaged wire insulation
Repair electrical problems before installing the new housings.
5. Remove the Factory Housings
Remove the factory mounting nuts while supporting the lamp from outside the vehicle. Release any locating pins carefully and pull the housing straight away from the body.
Do not pry aggressively against painted sheet metal.
6. Transfer the Factory LED Circuit Boards
Place the original and replacement housings on a clean, padded surface. Transfer the factory LED circuit boards, sockets and other required hardware according to the supplied instructions.
Avoid touching circuit-board contacts with dirty or wet hands. Confirm that every seal sits flat and that no wire becomes pinched between the circuit board and housing.
7. Install the Included Amber Bulbs
Install the supplied amber bulbs in their correct sockets. Confirm that each bulb seats and locks properly.
Do not substitute a bulb with a different wattage unless the manufacturer identifies it as compatible.
8. Clean the Mounting Surface
Remove dirt and debris from the body opening. Inspect the original sealing area for:
- Old gasket material
- Cracked seals
- Rust or corrosion
- Bent mounting surfaces
- Evidence of previous water leaks
Correct any body or sealing problem before installing the new lamps.
9. Install the DEPO Housings
Guide the studs and locating pins into their corresponding openings. Ensure the housing sits evenly against the body before installing the mounting nuts.
Tighten the fasteners evenly. Do not overtighten them; excessive torque can crack the plastic housing or distort its seal.
10. Reconnect the Wiring
Reconnect every electrical plug and verify that each connector lock engages.
Route the wiring away from sharp edges, trunk hinges and moving trim panels.
11. Test Every Function
Before reinstalling the trunk trim, test:
- Parking lights
- Brake lights
- Left turn signal
- Right turn signal
- Hazard lights
- Reverse lights
- Side markers
- Trunk-related lighting where applicable
Ask a helper to operate the controls while you inspect both sides of the car.
12. Check for Water Intrusion
After confirming operation, perform a controlled low-pressure water test around each housing. Inspect the trunk and lamp interior for moisture.
Do not direct a pressure washer into the lamp seams.
13. Reinstall the Trunk Trim
Once the housings remain dry and every function works correctly, reinstall the trunk liner and retaining clips.
Recheck operation after the vehicle’s first drive and after the first rainfall or car wash.
Why Upgrade Instead of Tinting the Factory Lamps?
Tinting an original lens may look inexpensive, but it creates several potential problems:
- Reduced light visibility
- Uneven finish
- Peeling film
- Cloudy adhesive
- Cracking spray coating
- Difficult removal
- Inspection or legal concerns
- Permanent alteration of usable factory lamps
Replacement housings preserve the original lamps for future use. Store the factory set in a dry location in case the car is sold, restored or returned to stock.
Match the Tail Lights to the Rest of the Build
The black-and-smoke finish works particularly well with:
- Black or gunmetal wheels
- Smoked side markers
- Dark window trim
- Subtle trunk spoilers
- Rear-window spoilers
- Black badges
- Dark gray, silver, white or black paint
- Type-S exterior trim
For owners upgrading the cabin along with the exterior, the Acura TL Stereo Wiring Diagram covers factory radio wiring across multiple TL generations, including the 2004–2008 model.
Common Installation Mistakes
Calling the Housings Fully Plug-and-Play
The vehicle connectors may remain factory-style, but the original LED circuit boards must be transferred. That is straightforward component reuse—not a completely assembled lamp swap.
Overtightening the Mounting Nuts
Plastic housings can crack or distort when fasteners are overtightened.
Pinching the Seal
A twisted or improperly seated gasket can allow water into the trunk or lamp housing.
Handling Bulbs With Bare Hands
Oil and contamination can shorten the life of certain automotive bulbs. Use clean gloves.
Failing to Test Before Reassembling the Trunk
Test every function before reinstalling panels. Removing the trim twice builds character, but very little else.
Ignoring a Weak Factory LED Circuit Board
The new housings reuse factory electronics. Diagnose dim or failed LEDs before blaming the replacement housing.
Using Excessive Silicone
Do not cover drains, vents or service openings with uncontrolled sealant. Use only lighting-safe sealant where the manufacturer’s instructions permit it.
Assuming Smoked Lenses Are Legal Everywhere
Verify lens markings, light output and local requirements before road use.
Care and Maintenance
Clean the lenses with:
- Automotive car-wash soap
- Clean water
- Soft microfiber towels
- Plastic-safe detailing products
Avoid:
- Abrasive compounds
- Household solvents
- Ammonia-heavy cleaners
- Harsh brushes
- Direct high-pressure spray at the seams
- Repeated dry wiping
Inspect the housings periodically for condensation, loose fasteners, damaged wiring or changes in light output.
Who Should Buy These Tail Lights?
This USR DEPO lamp set is a strong choice for:
- 2004–2008 Acura TL owners
- Base-model owners wanting a darker rear appearance
- Type-S owners replacing damaged housings
- JDM-inspired street builds
- Vehicles with cloudy or cracked original lenses
- Owners who want removable styling changes
- Builds using black or smoked exterior accents
They may not be the right choice for:
- Buyers seeking fully assembled lamps with new LED boards
- Vehicles outside the 2004–2008 third-generation TL range
- Owners who do not want to transfer factory components
- Jurisdictions that prohibit the specific smoke-lens configuration
- Cars with existing circuit-board or wiring failures
- Buyers seeking factory-original restoration parts
Frequently Asked Questions
Do these tail lights fit every 2004–2008 Acura TL?
The product is listed for third-generation Base, Type-S and other 2004–2008 TL trims. Verify the exact listing and part number before purchase.
Are these complete tail-light assemblies?
They include left and right housings, but installation requires transferring the factory LED circuit boards and applicable original components.
Are bulbs included?
The supplied product information states that one pair of amber bulbs is included.
Is custom wiring required?
Custom wiring should not normally be required when the correct factory electronics are transferred into compatible housings.
Do they fit the Acura TL Type-S?
Yes. The listing identifies compatibility with the 2007–2008 Acura TL Type-S.
Who manufactures these housings?
They are manufactured by DEPO in Taiwan and sold under the USR or Unique Style Racing product line.
Are the lenses tinted with film?
No. The product uses purpose-built smoked polycarbonate lenses over black internal housings.
Are smoked tail lights street legal?
Legality depends on required markings, light output and local regulations. Confirm compliance before road use.
Will these fix failed factory LEDs?
No. The housings reuse the original LED circuit boards. Failed electronics must be diagnosed or replaced separately.
Are these housings waterproof?
They are described as manufacturer-sealed and water resistant. Inspect the seals during installation and test for leaks before reinstalling the trunk trim.
Is a warranty included?
USR states that the product includes a one-year warranty. Confirm the current terms and seller requirements before purchase.
Final Thoughts
The USR DEPO black-housing tail lights give the 2004–2008 Acura TL a cleaner, darker appearance without permanently tinting the original lamps. They retain an OEM-style mounting arrangement while allowing the vehicle’s factory LED electronics to be reused.
Fit the seals carefully, transfer the circuit boards correctly and test every lighting function before putting the trunk back together. Most importantly, confirm that the smoked lenses remain legal and clearly visible where the vehicle will be driven.
A tail-light upgrade should make the TL look newer—not make the brake lights a community guessing game.



There are no reviews yet.