
Confirmed Vehicle Fitment
This coilover kit is designed for the following first-generation MINI applications:
| Chassis | Model | Production dates | Drivetrain |
|---|---|---|---|
| R50 | MINI Cooper | June 2001–September 2006 | Front-wheel drive |
| R50 | MINI One | June 2001–September 2006 | Front-wheel drive |
| R50 | MINI One D | June 2001–September 2006 | Front-wheel drive |
| R53 | MINI Cooper S | June 2001–September 2006 | Front-wheel drive |
| R53 | MINI Cooper S Works | June 2001–September 2006 | Front-wheel drive |
| R53 | MINI John Cooper Works | June 2001–September 2006 | Front-wheel drive |
| R52 | MINI Cooper Convertible | July 2004–November 2007 | Front-wheel drive |
| R52 | MINI Cooper S Convertible | July 2004–November 2007 | Front-wheel drive |
| R52 | MINI John Cooper Works Convertible | July 2004–November 2007 | Front-wheel drive |
| R52 | MINI One Convertible | July 2004–November 2007 | Front-wheel drive |
Important Fitment Exclusions
This kit is not listed for second-generation MINI chassis, including:
- R55 Clubman
- R56 Hatchback
- R57 Convertible
- R58 Coupe
- R59 Roadster
- R60 Countryman
- R61 Paceman
A 2007 model year does not automatically identify the chassis. Certain R52 convertibles continued into 2007 while the newer R56 hatchback had already entered production.
Verify the chassis code, body style, production date and original suspension before ordering. Our vehicle-fitment parts guide explains why the model year alone is not always enough to guarantee compatibility.
Product Specifications
| Specification | Details |
|---|---|
| Brand | maXpeedingrods |
| Product type | Height- and damping-adjustable coilover kit |
| Color | Gold |
| Damper design | Monotube |
| Damping adjustment | 24-level rebound adjustment |
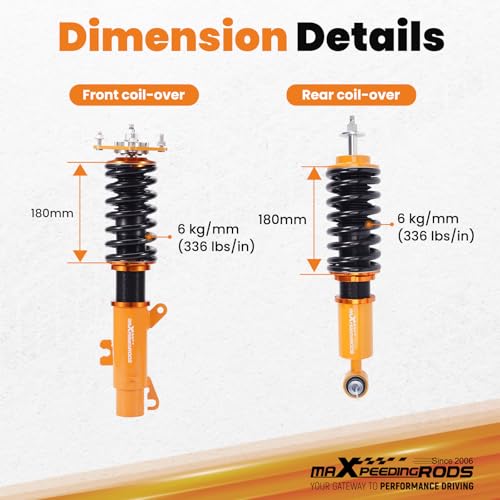
| Front spring rate | 6 kg/mm |
| Front spring equivalent | Approximately 336 lb/in |
| Rear spring rate | 6 kg/mm |
| Rear spring equivalent | Approximately 336 lb/in |
| Approximate lowering range | 1–3 inches |
| Drivetrain compatibility | Front-wheel drive |
| Front assemblies | Two |
| Rear assemblies | Two |
| Adjustment tools | Spanner wrenches included |
| Factory ride height | Not retained |
| Installation | Professional installation recommended |
| Alignment required | Yes |
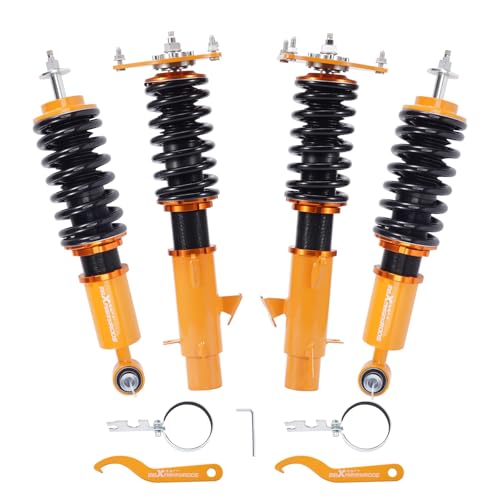
Complete Four-Corner Coilover Package
The package includes:
- Two front coilover assemblies
- Two rear coilover assemblies
- Matching coil springs
- 24-level rebound adjustment
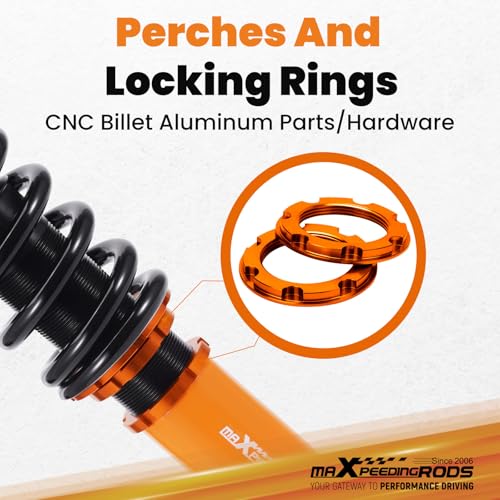
- Threaded ride-height adjustment
- Height-adjustment spanner wrenches
- Quick-installation guidance from the manufacturer
Professional installation labor is not included.
The kit is designed as a direct replacement for the original strut-and-spring assemblies. Some factory brackets, mounts, fasteners or related components may require inspection, transfer or replacement depending on the exact vehicle and the condition of its original suspension.
Compare every mounting point with the factory assemblies before beginning installation.
24-Level Rebound Adjustment
The major advantage of this kit over a basic fixed-damping coilover is its 24-level rebound adjustment.
Rebound damping controls how quickly the suspension extends after being compressed. Increasing rebound resistance slows that extension, which can reduce unwanted body movement and make the car feel more controlled during transitions.
Reducing rebound resistance allows the suspension to extend more freely, which can improve compliance over uneven pavement.
The manufacturer divides the adjustment range into three suggested groups:
- Levels 0–8: Street-oriented use
- Levels 9–16: Winding-road or performance-street use
- Levels 17–24: Track-oriented use
These ranges are starting suggestions, not universal settings.
The correct setting depends on:
- Ride height
- Tire construction
- Tire pressure
- Wheel weight
- Road surface
- Vehicle load
- Bushing condition
- Alignment
- Driving style
Begin with matching settings from left to right. Make changes in small increments and test the vehicle on a familiar road.
Do not set every adjuster to maximum simply because maximum is available. More damping is not automatically more grip. Excessive rebound can prevent a tire from returning quickly enough after a bump, producing a nervous or skittish ride.
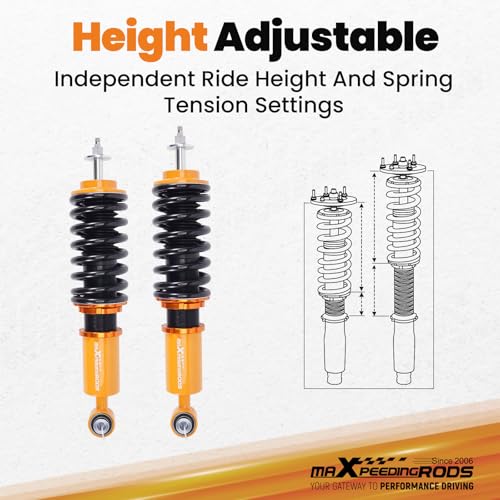
Height Adjustable From Approximately 1 to 3 Inches
This MINI coilover kit provides an advertised lowering range of approximately 1 to 3 inches.
The adjustment can be used to:
- Reduce factory wheel gap
- Create a more aggressive stance
- Lower the center of gravity
- Improve wheel fitment
- Reduce excessive body movement
- Fine-tune front-to-rear visual balance
- Adjust clearance around a specific wheel-and-tire package
The kit is specifically designed for lowering and may not return the vehicle to its original stock ride height.
For a daily-driven MINI, start with a moderate drop. The lowest setting may reduce:
- Suspension travel
- Bump-stop clearance
- Tire-to-fender clearance
- Front bumper clearance
- Exhaust clearance
- Subframe clearance
- CV-joint operating range
- Practicality on steep driveways
A lower MINI may look excellent until it encounters a speed bump constructed with the architectural ambition of the Great Wall.
Our Daily Driver Suspension Example That Works explains why a modest drop generally delivers a better balance of stance, handling and usable suspension travel.
Matching 6 kg/mm Spring Rates
The kit uses matching advertised spring rates at both ends:
- Front: 6 kg/mm, approximately 336 lb/in
- Rear: 6 kg/mm, approximately 336 lb/in
Although the numerical rates match, front and rear ride behavior can still differ because of:
- Vehicle weight distribution
- Suspension motion ratios
- Damper tuning
- Wheelbase
- Track width
- Tire loading
- Bushing compliance
Compared with the original MINI suspension, these springs should produce firmer body control and more immediate response.
Potential benefits include:
- Reduced body roll
- Reduced brake dive
- Faster transitional response
- Sharper steering feel
- Improved control during rapid direction changes
- More stable body motion during spirited driving
Ride quality will be firmer than stock, especially when combined with an aggressive drop, large wheels or low-profile tires.
Spring rate alone does not determine ride quality. Damping, suspension travel, tire sidewall, seat construction and road condition all contribute to what the driver feels.
Monotube Damper Construction
This kit uses a monotube damper design.
A monotube shock places its piston and pressurized fluid within a single main cylinder. Compared with a basic twin-tube design, a monotube layout can provide:
- More direct piston response
- Improved heat transfer
- More consistent damping during repeated use
- Better separation between fluid and pressurized gas
- Reduced risk of damping fade under demanding conditions
Those advantages make monotube coilovers attractive for spirited street driving and occasional motorsport use.
The design does not automatically guarantee a comfortable ride or professional race performance. Piston design, oil quality, gas pressure, valving and overall manufacturing consistency still matter.
“Monotube” describes the construction. It is not a magical word that turns a commuter car into a Nürburgring development mule.
Street and Performance Adjustment
The 24-step rebound control gives this kit broader tuning flexibility than a fixed suspension package.
Daily Driving
For normal street use, begin near the softer end of the adjustment range.
A softer rebound setting can help the suspension recover over:
- Pavement joints
- Broken asphalt
- Potholes
- Highway expansion gaps
- Uneven residential streets
Do not confuse soft with loose. The goal is controlled movement without unnecessary harshness.
Winding Roads
A moderate rebound setting can reduce body movement during:
- Rapid steering transitions
- Corner entry
- Braking
- Direction changes
- Elevation changes
Increase damping gradually and test after each change. If the car begins to skip across rough sections, reduce the setting.
Autocross and Track Use
Firmer settings may provide additional control on smooth surfaces, but maximum stiffness is not automatically the fastest setup.
Track preparation should also include:
- Fresh brake fluid
- Adequate brake-pad material
- Correct tire pressures
- Proper wheel torque
- Full suspension inspection
- Alignment suited to the event
- Adequate tire and fender clearance
Return the suspension to a road-appropriate setting before driving home if the track configuration is too firm for public pavement.
How These Coilovers Change MINI Handling
The MINI’s short wheelbase and responsive chassis already give it quick directional response. This coilover kit can make those characteristics more pronounced by lowering the center of gravity and increasing spring and damper control.
Drivers may notice:
- Quicker initial turn-in
- Reduced body roll
- Less front-end dive
- Firmer chassis response
- More immediate weight transfer
- Better control during rapid transitions
- A more planted stance
The tradeoff is reduced compliance.
An overly low or excessively stiff setup can make the MINI feel nervous on uneven roads. The short wheelbase that helps the car change direction quickly also makes aggressive suspension settings more noticeable inside the cabin.
Read Lowering Springs vs. Coilovers for a complete comparison of adjustment, installation cost, ride quality and long-term flexibility.
Better Handling Requires More Than Coilovers
Coilovers are one part of a complete chassis.
Before installing the kit, inspect:
- Front control-arm bushings
- Rear control-arm bushings
- Ball joints
- Tie-rod ends
- Sway-bar bushings
- Sway-bar end links
- Wheel bearings
- Strut mounting points
- Engine and transmission mounts
- Tires
- Brake hoses
- ABS wiring
Worn bushings can allow unwanted suspension movement even after new coilovers are installed. Damaged ball joints or tie-rod ends can create steering play that no damper adjustment will fix.
A properly selected sway-bar upgrade can further reduce body roll, but excessive bar stiffness can reduce grip or make the rear of a short-wheelbase car too eager to rotate. Learn how to balance the system in our guide to upgrading sway bars for better handling.
Installation Requirements
Professional installation is recommended.
Typical tools may include:
- Hydraulic floor jack
- Properly rated jack stands
- Wheel chocks
- Metric socket set
- Metric wrench set
- Breaker bar
- Torque wrench
- Hex or Allen tools
- Penetrating lubricant
- Pry bar
- Ride-height measuring tools
- Replacement fasteners where required
Never work beneath a vehicle supported only by a hydraulic jack.
The installer should follow the factory procedure for:
- Supporting the suspension
- Removing the original struts
- Disconnecting brake-hose brackets
- Protecting ABS sensor wiring
- Transferring required mounts or brackets
- Tightening structural fasteners
- Setting initial ride height
- Checking wheel clearance
Use the manufacturer’s installation guide and MINI service information for the exact model.
Set the Initial Ride Height Correctly
Before removing the original suspension, park the MINI on level ground and record:
- Hub center to fender height
- Pinch weld to ground clearance
- Front bumper clearance
- Rear bumper clearance
- Current wheel gap
- Left-to-right height differences
Hub-center-to-fender measurements are especially useful because they are not affected by tire diameter.
After installation:
- Set both front coilovers to matching lengths.
- Set both rear coilovers to matching lengths.
- Set all dampers to equal baseline positions.
- Install the wheels.
- Lower the vehicle carefully.
- Roll it forward and backward.
- Allow the suspension to settle.
- Measure all four corners.
- Adjust height in small increments.
- Check tire clearance at full steering lock.
- Tighten all locking collars.
- Perform a professional alignment.
Do not assume identical exposed thread counts guarantee identical vehicle height. Manufacturing tolerances, bushing condition and vehicle weight distribution can create differences.
Adjust Damping Correctly
Before changing the rebound setting, determine which direction is firmer and which is softer.
Never force an adjustment knob beyond its stops.
A practical baseline procedure is:
- Turn each adjuster carefully to the soft limit.
- Count the available positions.
- Set all four dampers to the manufacturer’s recommended street baseline.
- Drive the vehicle on a familiar road.
- Adjust both front dampers equally.
- Adjust both rear dampers equally.
- Change only two or three positions at a time.
- Record each setting.
- Reevaluate steering, grip and ride quality.
Changing one corner independently without a defined tuning reason can create inconsistent behavior.
If the MINI bounces repeatedly after a bump, additional damping may be needed. If it feels unable to recover and skips across rough pavement, the rebound setting may be too firm.
Check Wheel and Tire Clearance
Lowering affects the relationship between the suspension, wheels, tires and bodywork.
Inspect clearance at:
- Full left steering lock
- Full right steering lock
- Suspension compression
- Inside front wheel wells
- Front coilover bodies
- Brake hoses
- ABS sensor wires
- Fender lips
- Rear quarter panels
- Sway-bar links
- Inner tire sidewalls
Clearance depends on:
- Wheel width
- Wheel offset
- Tire width
- Tire diameter
- Camber
- Ride height
- Spacer use
- Vehicle load
A wheel that clears while the MINI is parked may rub during cornering, braking or compression.
A Professional Alignment Is Required
Installing coilovers changes suspension geometry.
After finalizing ride height, have the MINI professionally aligned.
The technician should inspect:
- Front toe
- Rear toe
- Front camber
- Rear camber
- Caster where measurable
- Steering-wheel position
- Left-to-right ride height
- Tire clearance
- Suspension fasteners
Toe has a major effect on stability and tire wear. Excessive toe can destroy tires even when the visible camber looks reasonable.
Our Wheel Alignment 101 guide explains how toe, camber and caster affect the way a lowered vehicle drives.
Post-Installation Inspection
After approximately 50 to 100 miles, inspect:
- Upper mounting hardware
- Lower mounting bolts
- Adjustment collars
- Locking rings
- Spring seating
- Brake-hose routing
- ABS wiring
- Sway-bar links
- Tire clearance
- Ride height
- Damper leakage
- New noises
Recheck critical fasteners using the correct torque specifications.
The springs may settle slightly after their first load and heat cycles. Complete the final ride-height adjustment before requesting the final alignment whenever possible.
Important Fitment Questions
Will these fit a 2007 MINI Cooper hatchback?
Only if the vehicle is a listed first-generation chassis.
The R52 convertible continued into 2007, but the R56 hatchback belongs to the second generation and is not listed for this kit. Verify the chassis code before ordering.
Will these fit an R56 MINI Cooper?
No. This kit is listed for R50, R52 and R53 applications only.
Will these fit a MINI Cooper S?
Yes. Listed R53 Cooper S models produced from June 2001 through September 2006 are included.
Will these fit a John Cooper Works MINI?
Yes, for the listed first-generation R53 and R52 John Cooper Works applications within the stated production dates.
Will these fit an R52 convertible?
Yes. Listed R52 Cooper, Cooper S, John Cooper Works and One convertibles produced from July 2004 through November 2007 are included.
Are these compatible with all-wheel drive?
No. The listed applications are front-wheel drive.
Frequently Asked Questions
How low do these MINI Cooper coilovers go?
The advertised lowering range is approximately 1 to 3 inches. They are designed for a lowered setup and may not retain the original factory ride height.
Are these damping adjustable?
Yes. The dampers provide 24-level rebound adjustment.
Do the front and rear springs have the same rate?
Yes. The advertised spring rate is 6 kg/mm, or approximately 336 lb/in, at both the front and rear.
Are these monotube coilovers?
Yes. The product is specified with monotube damper construction.
Can I use these coilovers on a daily driver?
Yes, but expect a firmer ride than the factory suspension. Begin with a moderate ride height and softer rebound setting for street use.
Can these be used at the track?
The height and rebound adjustment provide tuning flexibility for occasional track or autocross use. Inspect the complete vehicle and choose settings appropriate for the surface, tires and driver.
Do I need an alignment?
Yes. A professional alignment is required after the ride height has been finalized.
Are installation instructions included?
The manufacturer offers a quick-installation guide and baseline setup assistance. This does not replace factory service information or professional installation.
Does the package include installation labor?
No. The package contains suspension components and adjustment tools. Labor is separate.
Will the kit eliminate suspension noise?
A complete new assembly may eliminate noise caused by worn original dampers, but it cannot repair unrelated bushings, ball joints, wheel bearings, mounts or sway-bar links.
Final Take
These gold maXpeedingrods coilovers provide first-generation MINI owners with a complete height- and rebound-adjustable suspension package.
Key specifications include:
- R50, R52 and R53 fitment
- Front-wheel-drive compatibility
- 24-level rebound adjustment
- Monotube dampers
- 6 kg/mm front springs
- 6 kg/mm rear springs
- Approximately 1–3 inches of lowering
- Four complete coilover assemblies
- Height-adjustment tools
- Manufacturer setup guidance
The adjustment range allows the same kit to support a lowered daily driver, a weekend backroad car or an occasional autocross build.
Start with a moderate ride height, use conservative damping settings and finish the installation with a professional alignment. The MINI already has quick chassis responses; the goal is to sharpen them, not make the car react to every pavement seam like it received alarming news.
For additional suspension guidance, read our 7 Best Coilovers for Daily Driving article.





There are no reviews yet.