
What Do Bumper Quick Releases Do?
Quick-release fasteners are commonly fitted to bumper covers that must be removed regularly.
Applications may include:
- Track cars
- Drift builds
- Show vehicles
- Project cars
- Intercooler service
- Front-splitter adjustment
- Trailer loading
- Engine-bay access
- Collision-repair projects
- Bumpers with damaged factory side retainers
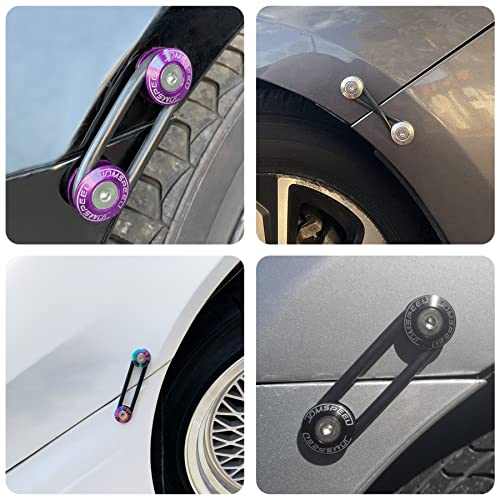
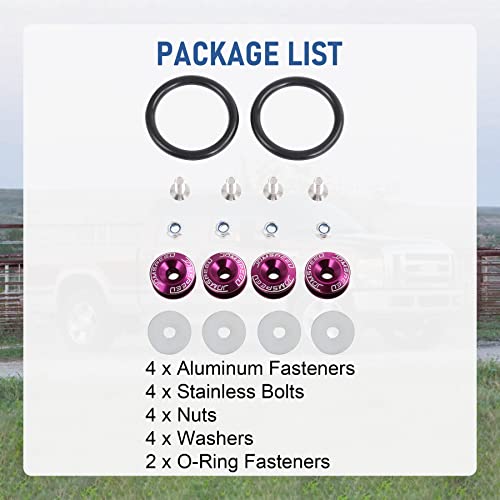
The O-ring stretches between the paired fasteners and applies tension across the panel seam. This can help keep the edge of the bumper cover aligned with the neighboring body panel.
Quick releases are not intended to carry the full aerodynamic or structural load of the bumper.
Universal Fitment Does Not Mean Drill Anywhere
The product is marketed as fitting all vehicles, but installation depends on the bumper design, body material and clearance behind the panel.
Before ordering or drilling, inspect:
- Bumper-cover thickness
- Fender or quarter-panel material
- Factory side brackets
- Crash-reinforcement location
- Parking sensors
- Blind-spot radar
- Wiring harnesses
- Headlight brackets
- Fog-light wiring
- Washer reservoirs
- Air ducts
- Intercooler piping
- Wheel-liner clearance
- Panel-seam alignment
Universal fasteners provide flexibility, not vehicle-specific instructions. Our vehicle-fitment parts guide explains why cosmetic hardware still requires careful measurement and compatibility checks.
Best Location for Bumper Installation
The most common installation places one fastener on the bumper cover and a second fastener on the adjacent fender or quarter panel.
The paired mounting points should:
- Sit on relatively flat surfaces
- Align with one another
- Provide clearance for the O-ring
- Avoid sharp panel edges
- Have accessible rear surfaces
- Remain clear of wiring and sensors
- Hold the bumper in its correct position
Do not use the O-ring to pull a badly misaligned bumper into place. Correct the bracket, guide or panel-fitment problem first.
A quick release should retain a properly positioned bumper—not serve as four purple witnesses to a larger bodywork issue.
Can These Be Used on a Trunk?
They may be used as supplemental decorative or race-panel hardware in an appropriate custom application. They must not replace the vehicle’s primary trunk latch.
Do not rely on O-rings to keep a street-driven trunk or hatch closed.
A trunk lid that opens while driving can:
- Block rear visibility
- Damage hinges
- Break the rear glass
- Strike another vehicle
- Release cargo
- Damage the body
- Create a serious traffic hazard
Maintain the factory latch, striker and safety provisions. Custom race-panel installations should be engineered for the vehicle and inspected by a qualified fabricator or motorsport official.
Do Not Remove Structural Bumper Components
Quick-release fasteners attach to cosmetic body panels. They do not replace:
- Bumper reinforcement beams
- Impact absorbers
- Crash boxes
- Airbag sensors
- Structural brackets
- Factory tow points
- Radar mounts
- Required lower fasteners
- Underbody supports
The plastic bumper cover and the metal reinforcement behind it perform different jobs.
The cover creates the visible exterior shape. The reinforcement contributes to collision management. Four anodized fasteners do not renegotiate that arrangement.
For a broader explanation of bumper materials, mounting hardware and test-fitting, see our car body kit guide.
How to Install the JDMSPEED Quick Releases
Professional installation is recommended when the mounting area contains sensors, thin sheet metal or expensive painted panels.
Tools You May Need
- Painter’s tape
- Measuring tape
- Removable marker
- Drill
- Step bit or properly sized drill bit
- Center punch
- Deburring tool
- Rust-prevention coating
- Ratchet and wrench set
- Plastic trim-removal tools
- Safety glasses
- Additional backing washers or plates, if required
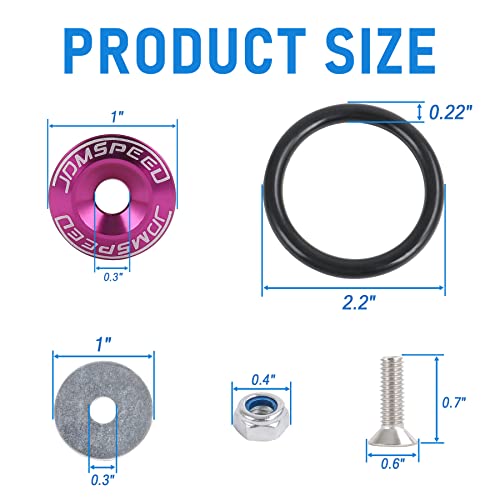
The correct hole size depends on the supplied bolts. Measure the hardware instead of selecting a drill bit through ambition.
Step 1: Position the Bumper Correctly
Align the bumper using its factory guides, brackets and mounting points.
Repair broken retainers or damaged supports before installing the quick releases whenever possible.
Step 2: Inspect Behind Both Panels
Remove or loosen the bumper enough to inspect the proposed hole locations.
Check for:
- Wiring
- Sensors
- Brackets
- Fluid reservoirs
- Electronic modules
- Sharp reinforcements
- Insufficient nut access
Never drill through a panel without knowing what is behind it.
Step 3: Mock Up the Fastener Pair
Hold one aluminum fastener against the bumper and the second against the adjacent body panel.
Install the O-ring temporarily around both pieces to evaluate:
- Alignment
- Stretch
- Panel tension
- Edge clearance
- Overall appearance
Step 4: Mark the Hole Centers
Use painter’s tape to protect the painted surface. Mark each hole carefully and compare both sides of the vehicle before drilling.
Symmetrical placement matters if installing one pair on each side.
Step 5: Drill Pilot Holes
Wear eye protection and begin with a small pilot hole. Increase the opening gradually until it matches the mounting bolt.
Do not allow the drill to contact wiring or finished surfaces behind the panel.
Step 6: Deburr and Protect Metal
If a hole passes through metal:
- Remove sharp edges.
- Clean away drilling debris.
- Apply touch-up paint or corrosion-resistant coating.
- Allow the coating to cure.
Bare metal around a decorative fastener can become a rust problem long after the purple hardware has stopped being exciting.
Step 7: Install the Aluminum Fasteners
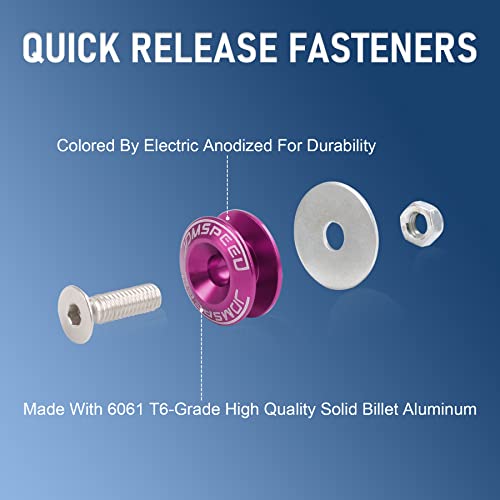
Insert each stainless bolt and install the washer and nut from behind the panel.
Use larger backing washers or fabricated reinforcement plates when the panel is too thin to support the supplied washer adequately.
Step 8: Tighten Carefully
Tighten the hardware evenly without crushing the bumper cover, distorting sheet metal or damaging the aluminum fastener.
No torque specification has been provided. Use controlled hand pressure and verify that the component is secure.
Step 9: Reinstall the Factory Hardware
Restore all usable factory clips, screws and brackets.
Quick releases should supplement the bumper-cover mounting—not become the entire mounting system.
Step 10: Attach the O-Rings
Stretch each O-ring between its paired fasteners.
The ring should apply enough tension to retain alignment without pulling the panels together excessively.
Step 11: Check Full Vehicle Clearance
Inspect:
- Tire clearance at full steering lock
- Wheel-liner clearance
- Hood or trunk movement
- Headlight and taillight clearance
- Parking-sensor operation
- Wiring position
- Panel gaps
Step 12: Inspect After the First Drive
After a short road test, recheck:
- Bolt tightness
- O-ring position
- Panel alignment
- Paint contact
- Bumper movement
- Sensor warnings
O-Ring Maintenance
The flexible O-rings are wear items.
Inspect them for:
- Cracking
- Dryness
- Stretching
- Cuts
- Heat damage
- Oil contamination
- Loss of elasticity
- Discoloration
Replace a damaged O-ring before driving.
Exposure to sunlight, engine heat, road chemicals and repeated stretching can shorten its life. Carrying spare rings is sensible on a vehicle whose bumper depends on them for supplemental retention.
Do not substitute office rubber bands, hair ties or miscellaneous hardware-store rings. The bumper has already endured enough improvisation.
Protecting the Paint
The O-rings and aluminum fasteners may move slightly as the body flexes.
To reduce paint damage:
- Keep the fasteners properly aligned
- Avoid excessive O-ring tension
- Remove dirt trapped beneath the rings
- Inspect contact points frequently
- Use paint-protection film where appropriate
- Replace rough or damaged rings
- Keep sharp hardware edges away from the panel
Dirt caught between an O-ring and the paint can act like abrasive compound.
Exterior and Engine-Bay Uses
The purple hardware may also be used for compatible nonstructural panels in a custom engine-bay or show-car application.
Potential uses include:
- Lightweight display covers
- Removable cosmetic panels
- Show-car trim
- Custom shrouds
- Nonstructural access panels
Do not use the kit to retain:
- Battery mounts
- Fuel-system components
- Brake components
- Heavy engine covers
- Radiator supports
- Cooling fans
- Structural braces
- Pressure-containing panels
- Safety shields
The kit is designed around removable bodywork and styling, not general mechanical fastening.
Who Should Buy This Kit?
The JDMSPEED kit is a strong option for builders who want:
- Purple exterior hardware
- Faster bumper-cover removal
- A drift- or track-inspired appearance
- Supplemental retention for repaired bumper tabs
- Reusable body-panel hardware
- Two complete fastener pairs
- 6061-T6 billet construction
It may not be appropriate when:
- Drilling is not permitted
- The bumper contains sensors at the proposed location
- The factory panels are already badly misaligned
- The vehicle is leased
- The installer cannot access the rear of the panel
- The hardware would replace a structural mount
- The trunk latch is being removed
Frequently Asked Questions
What is included?
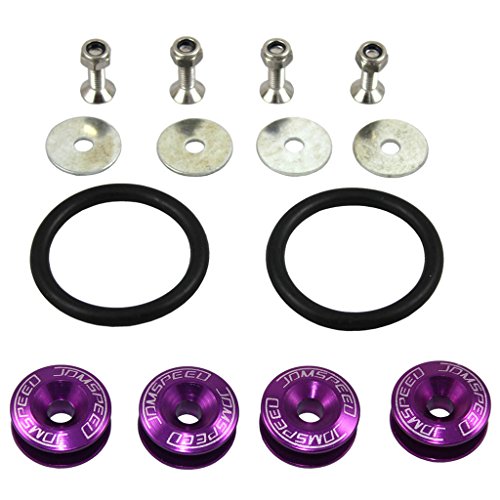
The package contains four aluminum fasteners, four stainless bolts, four nuts, four washers and two O-rings.
What color are the fasteners?
This kit has a purple finish.
What material is used?
The fasteners are described as 6061-T6 billet aluminum. The bolts are stainless steel.
Does the kit fit every vehicle?
It is universal hardware, but actual installation depends on panel shape, thickness, sensor location and rear access.
Does installation require drilling?
Yes, most bumper applications require drilling mounting holes.
How many bumper sides can one kit cover?
The four fasteners and two O-rings typically create two pairs, allowing one pair on each side of a bumper.
Can these fasteners replace the factory bumper mounts?
No. Retain the factory structural and lower mounting hardware wherever possible.
Can I use them as a trunk latch?
No. They must not replace the primary trunk or hatch latch.
Will they repair a broken bumper bracket?
They may provide supplemental retention, but the underlying bracket or guide should be repaired when possible.
Can the O-rings remain installed outside?
Yes, but they should be inspected regularly and replaced when cracked, stretched or damaged.
Are these suitable for race cars?
They may be useful for removable cosmetic panels, but the vehicle must still comply with the rules and inspection requirements of its racing organization.
Final Thoughts
The JDMSPEED purple quick-release fastener kit combines four 6061-T6 aluminum fasteners, stainless hardware and two O-rings in a compact universal package.
Installed correctly, the kit can make a frequently removed bumper cover easier to manage while adding a visible purple accent. The keys are proper panel alignment, safe drilling and continued use of the vehicle’s factory structural hardware.
They are quick releases for body panels—not four tiny billet replacements for automotive engineering.



There are no reviews yet.