


Anodized Aluminum-Alloy Construction
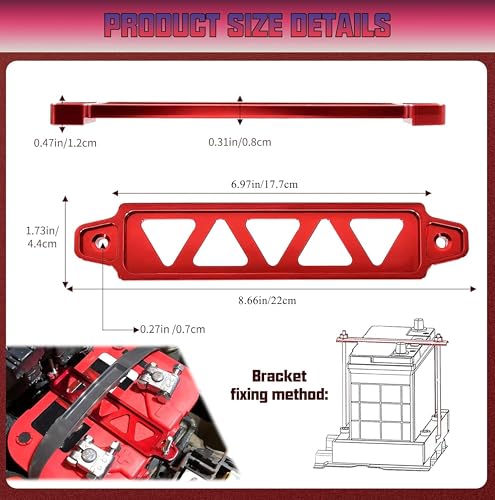
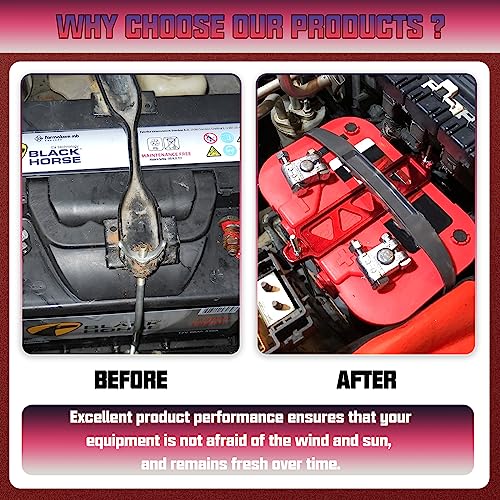
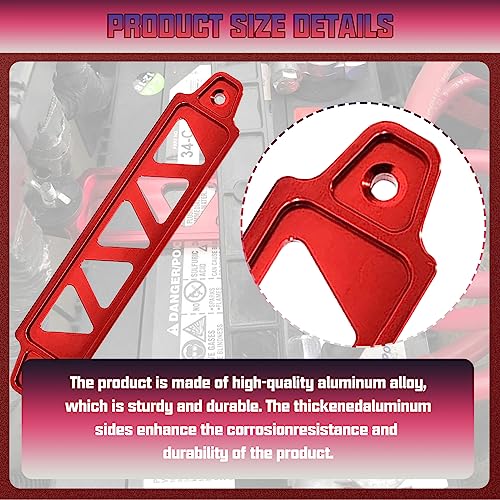
The bracket is manufactured from aluminum alloy and features a reinforced, side-thickened design. Its anodized surface improves appearance and provides additional resistance against ordinary moisture, oxidation and engine-bay contamination.
Benefits of the aluminum construction include:
- Lightweight design
- Rigid battery restraint
- Clean engine-bay appearance
- Resistance to conventional iron rust
- Anodized exterior finish
- Suitability for many street, tuner and restoration projects
Aluminum does not develop iron rust like untreated steel, but it can still oxidize or experience galvanic corrosion when exposed to moisture and dissimilar metals. Regular inspection remains important—because chemistry has never respected marketing departments.
Confirm Fitment Before Ordering
This bracket should not be treated as automatically universal. Battery dimensions, terminal positions and factory mounting systems vary considerably between vehicles.
Before purchasing, measure and verify:
- Battery-case width
- Installed battery height
- Battery group size
- Distance between the factory J-bolts or mounting studs
- Bracket slot dimensions
- Thread size and length of the mounting hardware
- Positive and negative terminal positions
- Clearance above the battery
- Hood clearance when closed
- Battery-tray condition
If you are comparing aftermarket components, the Vehicle Fitment Parts Guide for Smart Buyers explains why exact measurements and application notes matter more than a product photograph that looks approximately correct.
Battery Tie-Down Fitment Checklist
| Measurement | What to verify |
|---|---|
| Bracket length | Spans the intended battery mounting points |
| Slot spacing | Aligns with the vehicle’s J-bolts or studs |
| Battery height | Hardware reaches without excessive exposed thread |
| Terminal clearance | Bracket cannot touch either battery terminal |
| Hood clearance | Bracket and studs remain below the closed hood |
| Tray compatibility | Battery sits flat and securely in the tray |
| Vent clearance | Bracket does not obstruct battery vents |
| Case strength | Bracket contacts an approved reinforced area |
Do not assume that two batteries with similar exterior dimensions use identical terminals or hold-down locations.
Electrical-Safety Warning
Aluminum conducts electricity. The bracket must never touch the positive battery terminal, bridge the positive terminal to the vehicle body or contact both battery posts.
An incorrectly positioned metal bracket can create a direct short circuit capable of producing extreme heat, sparks, electrical damage or fire.
Before installation:
- Turn off the ignition.
- Remove the key or disable passive starting.
- Keep tools away from the positive terminal and nearby body metal.
- Protect exposed positive terminals with an appropriate boot or cover.
- Follow the vehicle manufacturer’s battery-disconnection procedure.
- Maintain clear space between the bracket and every terminal.
- Never place the bracket across battery posts.
- Verify clearance before closing the hood.
Some modern vehicles require battery registration, electronic relearns or memory procedures after power is disconnected. Review What Is Battery Registration, and Does Your Car Need It? before disconnecting a battery on a vehicle with an intelligent charging system.
Package Contents
The package includes:
- One aluminum-alloy battery tie-down bracket
- Corresponding installation accessories
The supplied description does not identify every fastener or provide hardware dimensions. Compare the product photographs and package list with your vehicle before installation. Additional J-bolts, nuts, washers, terminal protection or vehicle-specific hardware may be required.
How to Install an Aluminum Battery Tie-Down Bracket
Installation varies by vehicle. Always follow the repair procedure and tightening specifications for the exact year, make and model.
1. Park Safely
Park on a level surface, engage the parking brake and switch off the ignition. Allow the engine compartment to cool before working around the battery.
2. Inspect the Existing Installation
Check the:
- Battery case
- Battery tray
- Factory hold-down
- J-bolts or mounting studs
- Positive-terminal cover
- Cable condition
- Nearby wiring
- Hood clearance
Replace damaged or heavily corroded mounting hardware. A new bracket should not be attached to a tray that is quietly returning to the earth.
3. Disconnect the Battery if Required
Follow the manufacturer’s procedure. In conventional installations, the negative cable is normally disconnected first. If the positive cable must also be removed, reconnect it before reconnecting the negative cable.
Battery disconnection procedures can vary on vehicles equipped with battery sensors, security systems, stored adaptations or electronic accessories.
4. Position the Battery
Confirm that the battery sits flat and correctly oriented in its tray. Ensure the cables reach their terminals without being stretched, twisted or routed beneath the bracket.
5. Position the Tie-Down Bracket
Place the bracket across the manufacturer-approved portion of the battery case. Align its mounting slots with the J-bolts or studs.
Verify that the bracket does not interfere with:
- Positive terminal
- Negative terminal
- Terminal boots
- Battery caps
- Vent openings
- Battery sensor
- Wiring harnesses
- Hood insulation
6. Install and Tighten the Hardware
Start the nuts by hand and tighten each side evenly. The bracket should prevent battery movement without crushing, bending or deforming the battery case.
Use the manufacturer’s torque specification where available. More torque is not automatically better; the battery case is not auditioning to become a panini.
7. Reconnect the Battery
When both cables were disconnected, reconnect the positive terminal first and the negative terminal last unless the vehicle manufacturer specifies otherwise.
Ensure both terminals are clean, properly seated and tightened to specification.
8. Verify the Installation
Attempt to move the battery gently by hand. It should remain securely seated without rocking, sliding or lifting.
Check:
- Terminal clearance
- Cable slack
- Bracket alignment
- Even hardware tension
- Hood clearance
- Battery-tray stability
Close the hood slowly during the initial clearance check. Reinspect the bracket after the first few drives.
Why Battery Restraint Matters
A battery may weigh 30 to 60 pounds or more, depending on its construction and application. That mass can move forcefully during hard braking, cornering or a collision.
A properly fitted restraint helps:
- Maintain stable battery positioning
- Reduce stress on battery cables
- Protect terminal connections
- Limit vibration-related movement
- Preserve clearance from surrounding components
- Keep the battery seated during ordinary driving
A loose battery can also contribute to intermittent starting problems by pulling on its terminals or cables. If the vehicle produces rapid clicking during a start attempt, the Rapid Clicking When Starting a Car diagnostic guide covers loose terminals, poor connections, tray contamination and battery movement.
Engine-Bay Style Without Ignoring Function
The anodized finish makes this bracket suitable for engine bays where presentation matters. It can complement:
- Aluminum radiator components
- Anodized hardware
- Performance air-intake systems
- Silicone hose kits
- Aftermarket battery terminals
- Wire-management upgrades
- Street and show-car builds
Appearance remains secondary to secure fitment. The correct bracket should restrain the battery safely before it earns points for looking pretty.
Common Installation Mistakes
Assuming the Bracket Is Universal
Battery sizes and mounting systems differ. Always compare actual dimensions before ordering.
Allowing Contact With the Positive Terminal
Any conductive bracket touching the positive post and grounded metal can cause a severe short circuit.
Overtightening the Hardware
Excessive clamping force may crack or deform the battery case.
Reusing Damaged J-Bolts
Bent, corroded or incorrectly sized hardware may loosen or fail.
Ignoring Hood Clearance
Long studs or tall nuts can contact the underside of the hood. Confirm clearance before closing it completely.
Installing Over Battery Vents
Never obstruct battery ventilation openings, caps or pressure-relief features.
Using the Bracket to Compensate for the Wrong Battery
A tie-down cannot make an incorrectly sized battery suitable for the vehicle.
Ignoring Battery-Tray Corrosion
Inspect and repair corrosion before installing the bracket. Acid residue and weakened metal can undermine the restraint system.
Care and Maintenance
Inspect the bracket whenever the vehicle receives routine engine-bay service.
Look for:
- Loose nuts
- Bracket movement
- White oxidation
- Surface damage
- Corroded mounting hardware
- Battery-case distortion
- Terminal contact
- Cable tension
- Cracked terminal covers
- Deteriorated battery tray
Clean the bracket with a mild automotive cleaner and a soft cloth. Avoid aggressive abrasives that can damage the anodized finish.
If the battery frequently goes dead, do not assume the bracket is responsible. Use the diagnostic steps in Why Does My Car Battery Keep Dying? to investigate parasitic draw, charging performance, battery condition and connection problems.
Who Is This Battery Bracket For?
This aluminum battery holder may suit:
- Drivers replacing a worn factory tie-down
- Enthusiasts cleaning up an engine bay
- Project-car builders
- Street and show-car owners
- Restorations using compatible battery dimensions
- Vehicles with suitable J-bolt or stud mounting systems
It is not appropriate when:
- The bracket dimensions do not match the mounting points
- Terminal clearance cannot be maintained
- The battery tray is damaged
- The battery is the wrong size
- Required mounting hardware is missing
- The bracket obstructs battery vents
- Hood clearance is insufficient
- The vehicle uses a specialized or enclosed battery restraint
This product is intended for compatible automotive starter-battery installations. It is not intended for high-voltage hybrid or electric-vehicle traction batteries.
Frequently Asked Questions
What does a battery tie-down bracket do?
It secures the battery inside its tray and limits movement during acceleration, braking, cornering and ordinary road vibration.
Is this battery bracket universal?
Fitment cannot be confirmed without dimensions. Measure the battery, tray, mounting points and terminal clearance before ordering.
Will it fit any 12-volt car battery?
No. Voltage alone does not determine fitment. Battery group size, case dimensions, terminal position and mounting layout must all match.
Is aluminum safe around a car battery?
Yes, when the bracket is installed correctly and kept clear of the terminals. Aluminum is electrically conductive, so it must never bridge the positive terminal to ground.
Does anodized aluminum rust?
Aluminum does not form iron rust, but it can oxidize and corrode. Anodizing improves surface protection but does not make the part immune to chemical or galvanic corrosion.
How tight should a battery hold-down be?
It should be tight enough to prevent battery movement without cracking or deforming the case. Follow the vehicle or battery manufacturer’s torque specification when available.
Can I reuse the factory J-bolts?
Only if they fit the new bracket and remain straight, undamaged and free of significant corrosion.
Does the package include mounting hardware?
The supplied information states that corresponding accessories are included, but it does not identify every fastener or dimension. Verify the package contents before installation.
Can this bracket fix a damaged battery tray?
No. Repair or replace damaged mounting points and trays before installing a new restraint.
Should I disconnect the battery during installation?
Disconnecting it may be necessary for safe access. Follow the manufacturer’s procedure and determine whether battery registration or electronic relearns are required.
Final Thoughts
An aluminum alloy battery tie-down bracket can improve both battery security and engine-bay appearance when its dimensions match the vehicle.
Confirm the mounting spacing, battery size, terminal layout and hood clearance before ordering. During installation, keep the conductive aluminum bracket safely away from the battery posts and tighten it only enough to prevent movement.
The finished installation should look clean, hold the battery firmly and remain electrically uneventful. In battery work, “uneventful” is the premium feature.












There are no reviews yet.